10 Bixie Cut Hairstyle Ideas

A Bixie cut is a hybrid between a bob and a pixie. Think: shorter than a classic bob, longer and softer than a traditional pixie. It usually has lots of texture, light layering, and movement, with the length landing somewhere between cheekbone and jawline, sometimes slightly longer in front.
Because it sits in this “in-between” zone, the Bixie is super adaptable. You can wear it soft and pretty, shaggy and rock ’n’ roll, curly and voluminous, or sleek and tapered. It works on straight, wavy, and curly hair as long as the layers are customized to your texture.
Most Bixie cuts are moderate maintenance. You’ll need regular trims to keep the shape sharp and usually a small amount of daily styling—think mousse, texture spray, or a quick blow-dry or diffuser session. In return, you get a cut that looks styled with minimal effort and shows off your face beautifully.
Quick List
- Soft Layered Bixie Cut with Face-Framing Fringe Hairstyle
- Textured Wavy Bixie Cut Hairstyle
- Sleek Tapered Bixie Cut Hairstyle
- Curly Bixie Cut for Natural Texture Hairstyle
- Bixie Cut with Curtain Bangs Hairstyle
- Shaggy Bixie Cut with Piecey Layers Hairstyle
- Bixie Cut with Undercut Nape Hairstyle
- Side-Swept Bangs Bixie Cut Hairstyle
- Bixie Cut for Fine Hair with Built-In Volume Hairstyle
- Bold Bixie Cut with Color-Blocked Highlights Hairstyle
Soft Layered Bixie Cut with Face-Framing Fringe Hairstyle

This is the “intro to Bixie” look: soft layers, a gentle fringe, and a length that skims the jaw or just below. The back is slightly shorter for shape, while the front has longer face-framing pieces and a light, wispy fringe that can be worn parted or straight down.
It feels feminine and wearable, not too edgy—perfect if you’re moving from a bob into something shorter but don’t want a drastic pixie. The soft layers give movement without going full shag.
Pro tip: Ask your stylist for “a soft layered Bixie with jaw-length frontage and a light, wispy fringe that blends into the sides.”
How To Style
- Start with clean, towel-dried hair.
- Apply a lightweight volumizing mousse or foam from roots to mid-lengths.
- Blow-dry using a small round brush, lifting at the roots and turning the ends slightly under for softness.
- Dry the fringe by brushing it forward first, then sweeping it slightly to the side.
- If needed, add a few soft bends with a curling iron or flat iron on low heat.
- Rake through with your fingers to keep it natural-looking.
- Finish with a light mist of flexible-hold hairspray.
Best For
- Face shapes: Oval, heart, round
- Hair types: Straight to slightly wavy, fine to medium density
Tools & Products
- Blow-dryer
- Small round brush
- Volumizing mousse or foam
- Light heat protectant
- Flat iron or curling iron (optional)
- Flexible-hold hairspray
Styling Time & Difficulty
- Approx. styling time: 10–15 minutes
- Difficulty: Easy
Where This Hairstyle Works Best
- Everyday wear
- Office or school
- Casual dates and brunches
Maintenance Tips
- Trim every 6–8 weeks to keep the shape and fringe from getting too long.
- Use a lightweight conditioner only on mid-lengths and ends so roots don’t go flat.
- Refresh the fringe in the morning with a quick spritz of water and a round brush.
- Avoid heavy oils that can weigh down soft layers.
Textured Wavy Bixie Cut Hairstyle

This Bixie is all about movement and texture. The length sits around the cheekbones or just below, with choppy layers that enhance natural waves or create them with a curling wand. The overall vibe is beachy, undone, and modern.
It’s perfect if you like a slightly messy, “I woke up like this” look that still feels intentional. A bit of salt spray or texture spray is your best friend here.
Pro tip: Ask for “choppy, piecey layers with slightly longer bits in front so the Bixie can be styled wavy or air-dried with movement.”
How To Style
- Start on damp hair.
- Apply a sea salt spray or texture spray all over, scrunching it in from mid-lengths to ends.
- Let hair air-dry for a natural finish, or diffuse with a blow-dryer on low heat.
- Once dry, use a small curling wand to add a few loose bends where needed, alternating directions.
- Break up the waves with your fingers for a tousled look.
- Finish with a light, flexible hairspray or texture spray for hold.
Best For
- Face shapes: Oval, heart, square
- Hair types: Naturally wavy or straight with added texture, medium density
Tools & Products
- Sea salt spray or texture spray
- Blow-dryer with diffuser (optional)
- Curling wand (small to medium barrel)
- Light heat protectant
- Flexible-hold hairspray
Styling Time & Difficulty
- Approx. styling time: 10–20 minutes (depending on natural texture)
- Difficulty: Easy to medium
Where This Hairstyle Works Best
- Casual days and weekends
- Vacations and beach trips
- Creative work environments
Maintenance Tips
- Don’t overbrush; use fingers or a wide-tooth comb to keep waves defined.
- Use a hydrating mask weekly to balance out drying salt or texture sprays.
- Refresh on non-wash days with a spritz of water and a bit more texture spray.
- Trim every 8 weeks to prevent the ends from looking stringy or uneven.
Sleek Tapered Bixie Cut Hairstyle

This sleek Bixie has a more tailored, polished shape. The back and sides are lightly tapered or slightly cropped, while the top and front are kept a bit longer for styling flexibility. The finish is smooth and chic rather than textured.
It’s an amazing option if you like clean lines, minimal styling, and a slightly more sophisticated vibe—think “editor in a city office” energy.
Pro tip: Ask your stylist for “a tapered Bixie with a bit more length on top and around the face, soft graduation at the nape, and a sleek finish.”
How To Style
- Start with clean, towel-dried hair.
- Apply a smoothing blow-dry cream or serum from mid-lengths to ends.
- Blow-dry using a paddle brush, directing hair in the direction you want it to sit—usually forward and slightly to one side.
- Use a flat iron on low to medium heat to refine the ends and smooth any kinks.
- Tuck one side behind the ear for a sleek, asymmetric feel if you like.
- Finish with a tiny amount of serum on the ends and a light mist of shine spray.
Best For
- Face shapes: Oval, heart, long
- Hair types: Straight or easily smoothed, fine to medium
Tools & Products
- Blow-dryer
- Paddle brush
- Flat iron
- Smoothing cream or serum
- Heat protectant
- Shine spray (optional)
Styling Time & Difficulty
- Approx. styling time: 10–15 minutes
- Difficulty: Easy
Where This Hairstyle Works Best
- Office and professional settings
- Interviews, presentations, and events
- Minimal, polished everyday looks
Maintenance Tips
- Get trims every 4–6 weeks to keep the taper sharp.
- Use a smoothing shampoo and conditioner to help control frizz.
- Avoid heavy oils at the roots to prevent the style from going flat.
- Sleep on a silk or satin pillowcase to reduce friction and maintain smoothness.
Curly Bixie Cut for Natural Texture Hairstyle

This Bixie is shaped specifically for curls or coils. The back is slightly shorter to create lift, while the front and top have carefully carved layers that let curls stack and fall nicely without forming a triangle shape. The length typically hits between cheekbone and jaw.
It’s perfect if you want the fun of a shorter cut while fully embracing your natural texture. The right layering makes curls springy, defined, and easy to style.
Pro tip: Ask your stylist to cut your Bixie on dry or mostly dry curls, and to focus on “curl-friendly layering” so each curl family has space to form.
How To Style
- Start on freshly washed, damp hair.
- Apply a curl cream or gel evenly from roots to ends, scrunching upward.
- Use the “praying hands” method to smooth product over the surface, then scrunch again.
- Either air-dry or diffuse with a blow-dryer on low heat and low speed.
- Once completely dry, gently scrunch out any cast from gel with a tiny amount of lightweight oil.
- Fluff the roots carefully with fingers or a pick for volume without disturbing curl definition.
Best For
- Face shapes: Oval, round, heart
- Hair types: Wavy, curly, or coily, fine to thick
Tools & Products
- Wide-tooth comb or detangling brush
- Curl cream or curl-defining gel
- Blow-dryer with diffuser
- Lightweight hair oil
- Microfiber towel or cotton T-shirt
Styling Time & Difficulty
- Approx. styling time: 15–25 minutes (plus drying time)
- Difficulty: Medium
Where This Hairstyle Works Best
- Everyday wear
- Creative workspaces and social events
- Outdoor brunches or day dates
Maintenance Tips
- Trim every 8–12 weeks to maintain shape and remove dry ends.
- Refresh curls with a water + leave-in spray mix on non-wash days.
- Sleep with a satin bonnet or on a silk pillowcase to reduce frizz.
- Avoid cutting your curly Bixie wet at home—the shape can be unpredictable once dry.
Bixie Cut with Curtain Bangs Hairstyle

This Bixie merges two trends: the short, layered shape with soft curtain bangs. The length hits around the jaw, while the curtain bangs open up the face, sitting around the eyes or cheekbones and blending into side layers.
It’s a great option if you love framing around your eyes but still want the freshness of a shorter cut. The curtain bangs soften the overall look and give you styling variety.
Pro tip: Ask your stylist for “a Bixie with cheekbone-length curtain bangs that blend into the sides, with soft layering through the crown.”
How To Style
- On towel-dried hair, apply a light volumizing spray at the roots and a smoothing cream on mid-lengths.
- Rough-dry your hair until it’s about 70% dry, then switch to a small round brush.
- Blow-dry the curtain bangs forward first, then wrap them over the brush and away from the face on each side.
- Blow-dry the rest of the hair by lifting at the roots and directing ends under slightly.
- Add a few soft bends with a flat iron if you want extra movement.
- Finish with a light texture or finishing spray.
Best For
- Face shapes: Heart, oval, round
- Hair types: Straight to wavy, fine to medium
Tools & Products
- Blow-dryer
- Small round brush
- Volumizing root spray
- Light smoothing cream
- Flat iron (optional)
- Light texture or finishing spray
Styling Time & Difficulty
- Approx. styling time: 10–15 minutes
- Difficulty: Easy to medium
Where This Hairstyle Works Best
- Everyday wear
- Dates and dinners
- Semi-casual events and parties
Maintenance Tips
- Trim bangs every 5–8 weeks to keep them sitting at the right spot.
- Avoid heavy product buildup at the fringe—use dry shampoo if it gets oily.
- Refresh the curtain bang bend with a round brush on busy mornings.
- Don’t cut the bangs shorter than eye level if you want a soft, curtain look.
Shaggy Bixie Cut with Piecey Layers Hairstyle

This is the grungy, rocker version of the Bixie: lots of shaggy, piecey layers, a slightly messy fringe, and feathery ends. The shape is still Bixie—shorter in back, longer around the face—but with heavier texturizing and more attitude.
It’s perfect if you like your hair to look intentionally undone, cool, and a little rebellious. Dry texturizing sprays and matte pastes are key for this one.
Pro tip: Ask for “a shaggy Bixie with plenty of internal texturizing, piecey layers, and a soft, choppy fringe—not a blunt line.”
How To Style
- Start on dry or almost-dry hair.
- Apply a texture spray or light mousse and rough-dry with your fingers, lifting at the roots.
- Use a flat iron or small curling iron to add random bends, focusing on mids, not the ends.
- Break up the sections with your fingers to create separation.
- Emulsify a tiny amount of matte paste or wax between your fingers and pinch the ends of pieces to make them piecey.
- Finish with a light, flexible hairspray if you want a bit more hold.
Best For
- Face shapes: Oval, heart, square
- Hair types: Straight to wavy, medium to thick
Tools & Products
- Blow-dryer
- Texture spray or sea salt spray
- Flat iron or small curling iron
- Matte paste or lightweight wax
- Flexible-hold hairspray
Styling Time & Difficulty
- Approx. styling time: 10–20 minutes
- Difficulty: Medium
Where This Hairstyle Works Best
- Concerts and nights out
- Creative jobs and off-duty days
- Street-style, fashion-forward looks
Maintenance Tips
- Trim every 6–8 weeks to keep the shaggy layers from getting bulky.
- Use a clarifying shampoo occasionally if you use a lot of wax or paste.
- Don’t overload with product—start small and build; too much can look greasy.
- Consider a little root touch-up spray or powder if you like a slightly “lived-in” vibe between color appointments.
Bixie Cut with Undercut Nape Hairstyle
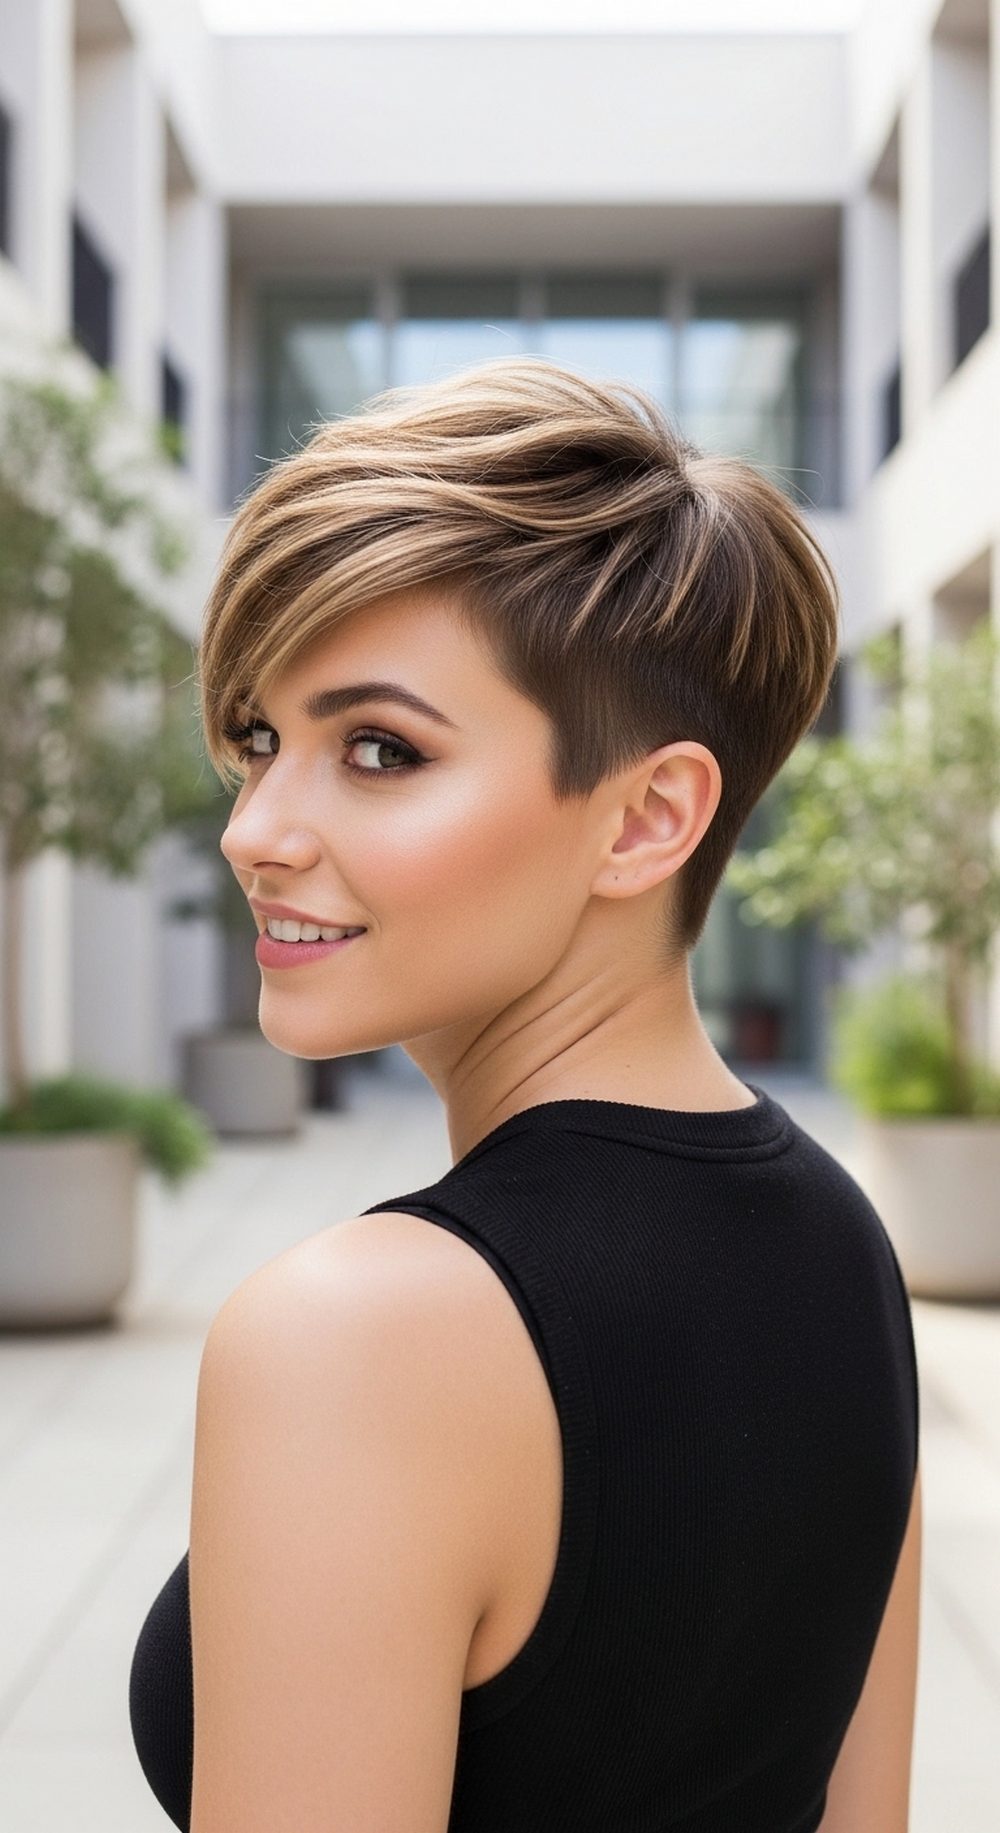
This Bixie includes a subtle undercut at the nape—shorter clippered or scissored hair underneath, with the Bixie layers sitting on top. The result is light, edgy, and super easy at the back while still having softness around the face.
It’s perfect if you run hot, wear high collars a lot, or just love a bit of edge. You can keep the undercut hidden when the top layers are down, or show it off when you tuck or pin the sides back.
Pro tip: Ask your stylist for “a Bixie with a soft nape undercut that follows your natural hairline and layers that cover it when worn down.”
How To Style
- Towel-dry hair and apply a lightweight styling cream or mousse.
- Blow-dry using your fingers, pushing the top layers in the direction you like—forward, to the side, or slightly back.
- Use a round brush only on the front if you want more polish, or keep everything finger-dried for a relaxed vibe.
- If desired, use a flat iron on low heat to smooth certain sections or create a few bends.
- Finish with a texture spray to add light volume and movement through the top.
Best For
- Face shapes: Oval, heart, round
- Hair types: Straight to wavy, fine to thick
Tools & Products
- Blow-dryer
- Fingers or small round brush
- Lightweight mousse or styling cream
- Heat protectant
- Texture spray
Styling Time & Difficulty
- Approx. styling time: 5–10 minutes
- Difficulty: Easy
Where This Hairstyle Works Best
- Everyday wear
- Active, on-the-go lifestyles
- Edgy or fashion-forward environments
Maintenance Tips
- Undercut areas usually need a touch-up every 3–5 weeks, depending on how fast your hair grows.
- Keep the top layers trimmed every 6–8 weeks to maintain the Bixie shape.
- Use sunscreen or wear hats if your undercut exposes more scalp in the sun.
- Avoid overusing heavy products on top; the contrast looks best when the top layers still have light movement.
Side-Swept Bangs Bixie Cut Hairstyle

This Bixie features a side-swept fringe that drapes diagonally across the forehead, blending into slightly longer front pieces. The rest of the cut is layered and soft, with gentle volume at the crown.
It’s a flattering choice if you like to highlight your eyes and cheekbones and prefer a side part over a middle part. The side fringe can be styled smooth or with a little tousle.
Pro tip: Ask your stylist for “a Bixie with a deep side part and long side-swept bangs that hit around the cheekbone, blended into the front layers.”
How To Style
- On towel-dried hair, create a deep side part where you naturally like it to fall.
- Apply a light volumizing spray at the roots and a smoothing cream on the fringe.
- Blow-dry using a round brush, directing the bangs across the forehead and slightly under at the ends.
- Blow-dry the rest of the hair, lifting at the crown for extra height.
- If needed, polish the fringe with a flat iron to keep it smooth and curved.
- Finish with a light hairspray focused on the fringe area.
Best For
- Face shapes: Round, square, heart
- Hair types: Straight to slightly wavy, fine to medium
Tools & Products
- Blow-dryer
- Small to medium round brush
- Volumizing spray
- Smoothing cream
- Flat iron (optional)
- Light hairspray
Styling Time & Difficulty
- Approx. styling time: 10–15 minutes
- Difficulty: Easy
Where This Hairstyle Works Best
- Office and meetings
- Dinners and date nights
- Everyday polished looks
Maintenance Tips
- Maintain the side fringe length every 5–7 weeks so it doesn’t drop too far into your eyes.
- Train your part by consistently styling it to the same side.
- Avoid heavy oils on the fringe to keep it airy and movable.
- Use a tiny roller or Velcro roller on the bangs while you do makeup for an easy, side-swept curve.
Bixie Cut for Fine Hair with Built-In Volume Hairstyle

This Bixie is cut specifically to make fine hair look fuller. It uses soft graduation at the back, stacked layers through the crown, and slightly longer, airy pieces around the face. The result is a rounded, lifted shape that gives the illusion of more hair.
It’s ideal if your hair tends to fall flat or look limp in a classic bob. The shorter length and smart layering help your fine strands work harder for you.
Pro tip: Ask for “graduated layers through the crown, minimal thinning, and a Bixie shape that keeps as much density as possible at the roots.”
How To Style
- Start with clean, towel-dried hair.
- Apply a volumizing mousse or foam at the roots and a lightweight heat protectant on lengths.
- Blow-dry with a round brush, lifting sections up and directing air at the roots for maximum lift.
- Focus extra effort at the crown and top back of the head.
- Flip your head upside down for the last few seconds of drying, then flip back gently.
- Finish with a light-hold hairspray or volumizing spray focused at the root area.
Best For
- Face shapes: Oval, heart, long
- Hair types: Straight to slightly wavy, fine or thin density
Tools & Products
- Blow-dryer
- Small to medium round brush
- Volumizing mousse or foam
- Lightweight heat protectant
- Light-hold hairspray or root lifting spray
Styling Time & Difficulty
- Approx. styling time: 10–15 minutes
- Difficulty: Easy
Where This Hairstyle Works Best
- Everyday looks for fine hair
- Office and school
- Any setting where you want your hair to look fuller with minimal effort
Maintenance Tips
- Regular trims every 6–8 weeks keep the structure and avoid thin, scraggly ends.
- Avoid heavy oils and thick creams; they can flatten the volume.
- Use a volumizing shampoo and a light conditioner just on the ends.
- Try not to over-touch your hair during the day; it can collapse the root lift.
Bold Bixie Cut with Color-Blocked Highlights Hairstyle

This Bixie takes things up a notch with bold, color-blocked highlights—think a lighter front panel, a contrasting money piece, or a pop of color through the fringe and top layers. The cut itself can be soft or textured, but the color makes it stand out.
It’s perfect if you love fashion hair and want your short cut to feel like a statement. Subtle contrast or high-impact color both work, depending on how bold you want to go.
Pro tip: Ask your stylist for “a Bixie cut with a visible color block at the fringe or front section” and bring reference photos of the placement you like.
How To Style
- Style your Bixie as you prefer—sleek, wavy, or tousled (choose what suits you best).
- For maximum impact, blow-dry the front colored section with a round brush to show it off.
- Use a heat protectant before any hot tools to keep color-treated hair healthy.
- Add a few soft waves or bends around the colored pieces for dimension.
- Finish with a shine spray to make the color pop and look glossy.
Best For
- Face shapes: Any face shape (customize cut and color placement)
- Hair types: Straight, wavy, or curly, fine to thick
Tools & Products
- Blow-dryer
- Round brush or paddle brush
- Heat protectant
- Curling iron or flat iron (optional)
- Color-safe shampoo and conditioner
- Shine spray or serum
Styling Time & Difficulty
- Approx. styling time: 10–20 minutes
- Difficulty: Easy to medium
Where This Hairstyle Works Best
- Parties, events, and nights out
- Creative and artistic workplaces
- Anytime you want your hair to be the main accessory
Maintenance Tips
- Use color-safe, sulfate-free shampoo to preserve vibrancy.
- Schedule color touch-ups every 6–10 weeks depending on your natural base and contrast.
- Limit high-heat styling and always use heat protectant to keep the color from fading too fast.
- Deep condition once a week if the hair has been lightened or heavily processed.
Conclusion
The Bixie cut is one of those in-between styles that gives you the best of both worlds: the lightness and attitude of a pixie with the softness and versatility of a bob. Whether you go sleek, shaggy, curly, softly layered, or bold with color, there’s a version that can fit your face shape, hair texture, and lifestyle.
You can keep things subtle with soft layers and a gentle fringe, or push it further with an undercut, heavy texture, or statement color. The key is getting the layering and length around your face just right so the cut works with your natural growth patterns and styling habits.
Don’t worry about getting it “perfect” on day one. Work with your stylist over a couple of appointments to fine-tune the shape, adjust the fringe, or tweak the layering. Small changes can make a huge difference in how low-maintenance and flattering your Bixie feels.
Ready to Try a Bixie Cut?
Pick 1–2 Bixie cut hairstyle ideas from this list that feel most like your style—maybe one softer, one a bit bolder. Save a few photo references from multiple angles so your stylist can see the length, layers, and fringe clearly.
At your appointment, talk honestly about your hair texture, cowlicks, how often you heat style, and how much time you want to spend on your hair each morning. With a few personalized adjustments—like shifting the length, adding or removing texture, or customizing the bangs—you can make a Bixie cut that looks great and fits seamlessly into your everyday routine.
FAQs
1. What exactly is a Bixie cut?
A Bixie cut is a hybrid between a bob and a pixie: shorter than a bob but longer and softer than a classic pixie. It usually has layered, textured lengths around the jaw or cheekbones, with a slightly shorter back and more length on top or around the face. It’s designed to give you movement and shape without committing to a very short crop.
2. Does a Bixie cut work on all hair types?
A Bixie can be adapted for most hair types—straight, wavy, and curly—as long as the layering matches your texture. Fine hair often needs built-in volume and minimal thinning, while thick hair benefits from internal texturizing to remove bulk. Curly and wavy hair need curl-friendly layers that allow the texture to form its natural pattern.
3. Is a Bixie cut high maintenance?
It’s usually medium maintenance. You’ll want trims every 4–8 weeks depending on how short and sharp you keep it. Styling can be quick—often 10–15 minutes—with a blow-dryer and a few products, or a diffuser for curls. The more you work with your natural texture instead of against it, the easier it will be.
4. How do I style a Bixie without heat?
You can air-dry with product. On damp hair, apply mousse, cream, or gel suited to your texture. Scrunch for waves, twist small sections for soft bends, or define curls with your fingers. Let it air-dry completely, then break up any stiffness with your hands. Texture spray can add extra movement without a blow-dryer or hot tools.
5. How often should I trim a Bixie cut?
Most Bixie cuts look best with trims every 4–8 weeks. Shorter, more tapered versions (or cuts with undercuts) may need a refresh closer to 4–6 weeks, while softer, longer Bixies can stretch closer to 8 weeks. Regular trims keep the shape balanced and prevent the cut from growing into a bulky, awkward length.
6. Can I grow out a Bixie cut easily?
Yes—Bixies grow out more gracefully than very short pixies because you already have some length around the face. Your stylist can gradually transition the shape into a bob by trimming the back while allowing the front to grow, or by softening layers and fringe as they lengthen. Expect a few in-between stages, but with small tweaks it can look intentional.
7. What if I have cowlicks or a tricky hairline?
Cowlicks and strong growth patterns can absolutely work with a Bixie—you just need the right fringe and parting. Tell your stylist exactly where your hair splits or sticks up. They can adjust the direction of layering, fringe length, and part placement so the cut works with the cowlick instead of fighting it, which makes styling much easier day to day.